Last Updated: Thu 05 Apr 2012 02:50:19 PM EDT
| Revision History | |
|---|---|
| April 05, 2012 | |
| Document the fact that WhenToManage will drop configuration items with blank names. | |
| January 11, 2012 | |
| Adding clarity to the fact that a configuration sync should be the complete configuration, not a change set. | |
| October 14, 2011 | |
| Added updated graphics to Data Validation and Verification to reflect new application skin. | |
| September 29, 2011 | |
| Order level Promo help section. Promo amounts for multiple items. | |
| August 10, 2011 | |
| Add Integration Tips section. It clarifies things already documented in the XML, but important enough to point out again. | |
Table of Contents
- 1. Introduction
- 2. Test Accounts
- 3. Setting up the WhenToManage Application
- 4. POS Terminology
- 5. Integration Details
- 5.1. Work flow
- 5.2. Versioning
- 5.3. Schemas
- 5.4. General Data Types
- 5.5. Validating your XML export
- 5.6. Importing your XML
- 5.7. Successful Validation/Sync Response and Error Reporting
- 5.8. Understanding Versioning
- 5.9. Data send time frames
- 5.10. Syncing Historical data
- 5.11. Important Sync Notes
- 5.12. Retrieving shifts
- 5.13. Integration Tips
- 5.14. Item Promo Amounts
- 5.15. Notable Special Cases
- 6. Data Validation and Verification
- 7. Examples
This document provides all of the necessary information for integration with the WhenToManage Universal POS Data Exchange application. The information included is intended to provide a reference of: high level terminology, low level data points, and how the integration work flow progresses.
For a number of years, WhenToManage has been syncing data with various POS systems. Each of these integrations has been custom written, often times by WhenToManage working closely with the POS developers to understand and translate business rules. We have performed two types of syncs, "pull" where the POS data is on a central server and we utilize their API to pull data into WhenToManage, and "push" where the POS data resides in the store and the back-of-house machine pushes data out to the WhenToManage servers via some type of extract.
We find that the "push" type of sync is better for both the POS company and WhenToManage as the intelligence about which data is valid or which data has changed resides on the POS system. With this in mind, we have created a representative data set and an XML schema for gathering the data that fits the needs of our shared customer base.
The Universal POS Data Exchange represents the extract files the POS should produce and provides documentation on how to get those extracts to WhenToManage to take advantage of all the features WhenToManage offers.
WhenToManage (WTM) provides fantastic web-based software for restaurants. You are able to schedule and communicate with your employees, manage your inventory, supply-chain, and recipes, and get insightful report data from a POS.
Manipulating your data into our format removes the ambiguity associated with specific POS systems and their implementations. It distills it down to the essential data needed for not only detailed store reporting, but also above-the-store enterprise reporting.
The benefits do not stop at reporting; if labor management is integrated to WhenToManage, you have above-the-store reporting, simple scheduling and early clock-in prevention. Using WhenToManage inventory, when integrated to the POS, can save thousands or more a month across a large enterprise by helping users monitor costs, watch out for theft, and understand what new inventory should be ordered.
There is tremendous additional depth to our offering. We relate this basic information to help developers understand what they will be accomplishing by integrating. For more information, or to schedule a demo, visit us online: http://www.whentomanage.com
In order to test and validate your integration, you will need to
have a test account. An account enables you to upload data and see it live
in WhenToManage. In order to do this, please speak with your account
manager. If you do not have one, please email
<admin@whentomanage.com> to start the process.
The following information is required to setup your account:
Your Name
Email Address
We will create a test account for you and email you a set of POS syncing credentials, as well as credentials to login to the application at: https://my.whentomanage.com
This account will be a fully featured account, however it should be used only for testing and validation purposes.
To reset the configuration and delete all transactional data in a test account, go to: https://pos.whentomanage.com/updx/clean.php
This process is only possible on the test accounts supplied, never on a live client.
There are some initial configurations that you are required to set up before syncing with WhenToManage. Below are descriptions of each configuration and a link to our Knowledge base to show you "how" to set up.
Setting the Start of Week is important so that all of the reports start and end on the desired days. To configure your Weekly Start Day and Hours, click here.
Day parts are parts of your business day that you would like to track separately. The most common day parts are Lunch and Dinner, but most POS systems allow for multiple day parts. You must setup at least an "all day" day part. To configure Day Parts, click here.
WhenToManage allows the customer to set whether or not discounts are included in Net Sales in reports. To configure this setting, click here.
Terminology can vary greatly between businesses. The following details are intended to alleviate confusion by providing a base set of definitions.
Employee refers to any person working in the store. Generally, this corresponds to any person who has a username and can log in to the system. It might also be a support tech login, above-store (enterprise) login, and/or generic logins such as "Banquet 6" or "Bar 3".
Job refers to the types of work performed by employees in the store for which a shift may be scheduled. One thing that might be confused with "job" is that some POS systems have grouping of jobs or employees that give them certain permissions on the system, or group them in other ways for reporting. For instance, the system might have "Admin" as a group covering the jobs "Manager", "Asst Manager", "Supervisor" and "Bartender". Job in this sense is only interested in the actual job, "Manager", not in the grouping.
Tender Type refers to a means of paying for a check or account balance. Examples include: Cash, Visa, Check, and Gift Card. Each Tender Type is also categorized by its PAYMENT_TYPE, i.e whether it is cash, credit, voucher, etc. These will be used to group Tender Types together in reporting.
Revenue Center refers to a section of the restaurant for which individual reporting may be done. A restaurant might have this setup as: "Dining Room", "Bar", and "ToGo" as their three revenue centers.
Comp or complimentary refers to a price adjustment made to a check due primarily to customer satisfaction issues.
Promo or promotion refers to a price adjustment given due to coupons, special ads, employee meals, etc. This is different than a "comp" in that the price adjustment is a planned adjustment.
Void refers to an item that was voided on an order.
Account or House Account refers to a per-arranged agreement for a diner or company to pay their bills at a later time instead of at the time of dining.
Payment Reason refers to a textual explanation of why a paid in or paid out was made.
Voucher is a miscellaneous tender type other than gift card, cash, or credit card. This can be similar to a house account where the voucher will be paid for at a future time.
Menu Item refers to any individual thing on the menu or the modifiers that can go with it. The obvious ones would be "Burger" and "Fries", but also "No Ice", "Rare", "Well" or "Add Cheese".
Menu Item Category refers to a grouping above the menu Items that allows grouped reporting and organization. A distinct menu item may only belong to a single menu item category.
The restaurant industry has many terms that are used interchangeably, WhenToManage defines the terms order, check, transaction, and item as follows:
If a party comes in and sits together at one table and orders together, eats together, etc. that is an order.
When the party pays, this order can be split into separate checks, the sum of those checks adding up to the total amount owed for that party's dining.
Each of these checks can be paid for with one or more transactions or tender types.
A single party coming in, eating, and paying, an order may look like this:
order #100 has (3 checks):
check #1 has:
transaction #1, paid: $5.00 with Visa
transaction #2, paid: $39.50 with Cash
check #2 has:
transaction #1, paid: $10.00 with Gift Certificate
transaction #2, paid: $20.00 with House Account
transaction #3, paid: $15.00 with Cash
check #3 has:
transaction #1, paid $5.00 with Master Card
Items are any of the things sold on the order (e.g., Burger, fries, shake, w/tomato, w/BBQ sauce). WhenToManage does not currently utilize which check the item belongs to since we are generally reporting on aggregated data. Many POS's do differentiate which items were on which check and this information is accounted for in the XML files. read about: All items on one Check
An item's "price" can have many different interpretations, from gross price to net price. The best way to describe what our XML names as ADJUSTED_PRICE in ITEM and MODIFIER might be "the store's take on the sale."
Example 1: let them sell a burger at $10 with a $0.50 promo, then the adjusted_price, the store's take, is $9.50.
Example 2: let them sell a beer at $5 with $1 inclusive tax. The adjusted_price is $4.
Example 3: let them sell 4 beers at $5 each with $1 inclusive tax each. That's $20 in sales, but only $16 goes to the store.
Example 4: in Example 3 let them give a $5 promo because they like the customer. Since there is inclusive tax, the way the promo breaks down is $4 from the store's take and $1 from the inclusive tax. The final price to the customer is $15 of which $3 is inclusive tax and $12 is the store's take.
The XML sent would contain:
...
<ADJUSTED_PRICE>12</ADJUSTED_PRICE>
<TAX_INCLUSIVE>3</TAX_INCLUSIVE>
<ITEM_PROMO>
<AMOUNT>4</AMOUNT>
</ITEM_PROMO>
...
Voided items are a bit different. Since they don't go into net sales, the ADJUSTED_PRICE of a void item should just be the value which you want to appear in reports, in most cases the full menu price. WhenToManage will only report on one number for voided items; comps, promos or taxes are not taken into account. For instance, if you have a voided bottle of wine that costs $49, the ADJUSTED_PRICE should be $49, even if that includes $5 inclusive tax.
WhenToManage recognizes two types of taxes; Exclusive Tax and Inclusive Tax. Exclusive Tax might generally be referred to as "sales tax" and is applied above and beyond the menu price of an item. Inclusive Tax is tax included in the menu price of an item. In the US this comes mostly in the form of alcohol taxes. In most other countries it is the VAT tax.
Most POS systems have a feature where an item may be split between several diners.
When this feature is present there are two options for putting it into a usable format:
The quantity of the "main" item (the seat it was originally ordered at) should contain the quantity ordered. All other sub-items have quantity set to 0. This way the qty sold will not differ between WhenToManage and the POS. In this case, the cost is usually also split and each item in the transactional data should have its own cost.
All the split items can be wrapped back into the main item and only that item synced.
All restaurants utilize petty cash to an extent. Money going in or out of petty cash is tracked. WhenToManage calls these paid ins and paid outs "payments" (this is differentiated from "transactions" in reference to money paid to pay for an "order"). These are included with orders in the transactions XML file.
Many POS systems also track cash deposited at the bank at the end of the day. WhenToManage calls these just "deposits". Deposits may also be entered in our web interface. These are included with orders in the transactions XML file.
POS systems also generally provide a means for tracking employees' working hours. WhenToManage references these time cards as timeslips. These are included with orders in the transactions XML file.
This section should include all of the low level information required to generate a configuration and transactional XML file to send to WhenToManage
The basic steps for syncing data from a POS to WhenToManage looks like this:
Create XML extract files from your POS
Upload the "configuration" type XML file to WhenToManage through the web service (https://pos.whentomanage.com/index.php)
Upload the "transactional" XML file to WhenToManage through the web service (https://pos.whentomanage.com/index.php)
Fetch the schedule XML from WhenToManage and process it into your POS scheduling system [optional]
Repeat steps 2-4 at least once daily or up to every 15 minutes if programmed for real-time syncs
Each "release" of UPDX is versioned and the files provided by the client, configuration and transactions, should use the same version number.
In some cases actual schemas may not differ across versions of UPDX, but versioning all files together should make it easier for each client to keep track of the version it is using and prevent piecemeal upgrades. This format also allows WTM to guarantee that transaction and config files work together, which WTM could not do if a client were on, say, config 1.1 and transactions 1.5.
All file formats are in an XML format. XML schemas are available in three formats: XML Schema, RelaxNG and RelaxNG compact format. The RelaxNG schema is used by the import to validate your XML file before processing.
These schemas are designed after years of experience integrating with POS systems and contain all the necessary data for general restaurant reporting. The data can be broken down into three groups. There is configuration data, transactional data and scheduling data.
All the data points in the formats are documented in detail. [1]
Sample XML files are included, which should make the layout easier to see at first. "View Source" in Chrome if it only displays text.
Configuration schema - mostly static data, nothing that changes during typical daily operation
| Version | Links |
|---|---|
| 1.1 | Documentation || Sample XML File || RelaxNG | RelaxNG compact | XML Schema |
| 1.0 deprecated | Documentation || Sample XML File || RelaxNG | RelaxNG compact | XML Schema |
Transactional schema - orders, checks, transactions, time and attendance, payments, deposits
| Version | Links |
|---|---|
| 1.1 | Documentation || Sample XML File || RelaxNG | RelaxNG compact | XML Schema |
| 1.0 deprecated | Documentation || Sample XML File || RelaxNG | RelaxNG compact | XML Schema |
Scheduling Schema - shift data exported from WhenToManage for use with POS system
| Version | Links |
|---|---|
| 1.0 | Documentation || Sample XML File || RelaxNG | RelaxNG compact | XML Schema |
The schemas define and enforce some constraints, however others must be identified as business rules. Your export process should respect the following requirements:
All unique ID's (orders, timeslips, etc) must be integers. Some systems use GUID's or unique text keys, but the field sent must be an integer <= 4294967295.
Dates must be in the format YYYY-MM-DD. Any other format will result in undefined behavior, as well as any invalid dates will result in undefined behavior.
DateTimes must be in the format YYYY-MM-DDTHH:mm:ss with the same caveats as Dates. DateTimes should be provided in the store's local time.
Times must be in the format HH:mm:ss with the same caveats as Dates.
Pay attention to decimal and integer values in other numbers. Their data types are listed in the schema documentation and include, e.g. whether they allow negative values or zero or only positive.
Decimal values are always 2 significant digits. Any rounding that occurs must happen before the data is synced so that the values total up correctly. For example, if you have 61 cents for a promo distributed across 4 ITEMs, instead of each being $0.1525, three would be $0.15 and one $0.16.
Boolean data types are as permitted in the XML Schema data type spec {true, false, 1, 0} http://www.w3.org/TR/xmlschema-2/#boolean
Note that the PAYMENT_TYPE element of TENDER_TYPE is an enumeration.
State/Province names should be valid, however the system will accept any combination of text or abbreviations.
Phone numbers should be in the right format for your locale, the system will accept free form data.
Specific character length limits have not been added to strings in the schemas. WhenToManage has reasonable lengths for all their strings, but if your data exceeds the limit, it will be truncated.
Other data will not be validated, but if it is expected to be useful should be in a reasonable format.
Once you have generated your XML files according the schemas and want to test them out, you may do so without having an account set up. Upload the matching file to:
Configuration: https://pos.whentomanage.com/updx/configuration.php
Transactions: https://pos.whentomanage.com/updx/transactions.php
For validation, send one file at a time, correctly named for the type you are testing.
The file size limit is 20MB but there no other restrictions except that it should represent what you want to test, be it valid XML or specific error codes.
Once the files have been extracted, the POS needs to send them to the WhenToManage servers so that they may be processed.
This is a simple process of a file upload via https POST to the URL https://pos.whentomanage.com/index.php. The syncing POS needs to provide credentials and information about what is being uploaded.
The following REQUEST variables must be sent to the server, It does not matter if they are POSTed parameters or part of URL, i.e. GET parameters.
| Variable Name (case sensitive) | Description |
|---|---|
| username | POS sync username |
| password | POS sync password |
| locationid | Store Location ID |
| file_category | "transactions" or "config". "config" type does not require archive_date or changeset. |
| changeset | If present, and the parameter has a non-empty value, then the XML is processed as changeset data. Not to be mixed with archive_date. |
| archive_date | The business date of the full data in the daily transactional import. Not to be mixed with changeset. The format is "YYYY-MM-DD". |
| special (no variable name): file upload (config.xml or transactions.xml) | The XML file itself should be attached in the POST request. A file with configuration should be named "config.xml" and a file with transactional data should be named "transactions.xml", both lowercase. It is recommended that the file be gzipped before sending in order to reduce bandwidth as some stores may be on slow connections. |
You may pass either changeset, or archive_date, not both. If both variables are supplied, an error will be returned. "config" file_category does not require archive_date or changeset
See the examples for simple code to upload a file from C#.
See the examples for simple code to upload a file from PHP.
When either validation or a data sync is successful the response looks like:
<?xml version=1.0">
<success />
If the wrong credentials are supplied when POSTing data WhenToManage will not return XML, instead it sends a plain text string, "failure,Login Credentials are incorrect." This is the WhenToManage legacy message for bad credentials which older clients use, so we're stuck with it for now. Another reason for having such a simple message is, without the proper credentials, WhenToManage cannot discern the store's POS type and therefore cannot tell the difference between an older client and a new Universal client. [2]
Errors are reported in a standard XML format. This format is returned when using the validation tool, as well as the standard import. Of course only validation level errors will be returned when using the validation tool.
An XML failure response looks like:
<?xml version=1.0">
<?xml-stylesheet type="text/xml" href="errors.xsl"?>
<errors>
 <error>
   <generator>WhenToManage</generator>
   <code>40</code>
   <description>You had an error</description>
   <line_num>3</line_num>
 </error>
 <error>
   <generator>libxml</generator>
   <code>60</code>
   <description>The GOAT tag doesn't belong here</description>
   <line_num>43</line_num>
 </error>
 <error>
   <generator>jing</generator>
   <code>60</code>
   <description>The MASTER is not formatted correctly</description>
   <line_num>53</line_num>
 </error>
</errors>
There are three types of errors generated:
WhenToManage - Something internal to WhenToManage import process has gone wrong, such as empty file, wrong name, etc.
libxml - An xml error was generated during validation of your xml document.
jing - An xml error was generated during jing validation (this is used due to libxml2 reporting inprecise errors when elements are missing or formatted incorrectly. The jing errors will point you exactly to your problem. The jing error reporting only occurs when posting data to the validation service. When posting a file for actual data sync, the jing process will not run, only the libxml validation.
| Code | Description |
|---|---|
| 1 | The uploaded file exceed the max file size |
| 2 | The uploaded file exceeds the MAX_FILE_SIZE directive that was specified during form upload |
| 3 | The uploaded file was only partially uploaded |
| 4 | No file was uploaded |
| 10 | URL is not for public consumption |
| 20 | Upload one file at a time |
| 30 | Wrong name for file |
| 35 | File is empty |
| 40 | Missing or duplication version element |
| 50 | Invalid version |
| 60 | Invalid XML |
| 70 | Archive Date and Change Set are mutually exclusive options |
| 80 | Archive Date is for an historical date earlier than client's POS product allows |
| 90 | Change Set contains data for an historical date earlier than client's POS product allows |
| 100 | You must upload at least one configuration file before you can upload transactions |
| 105 | When uploading the first configuration it must be the specified Enterprise Template Store. |
| 110 | Incorrect request paramaters, "transactions" must send either archive_date or "changeset" |
| 120 | Incorrect request paramaters, unknown file_category |
| 130 | Incorrect request paramaters, missing file_category |
| 200 | Every MODIFIER must be connected to an ITEM on the same check via the ITEM_NUMBER element. (This will also include the order id, check number and mod number where the error occurred.) |
| 500 | Internal Server Error |
We use the libxml2 library for validation. Our validation errors come straight from there without much processing. Most of them are informative, but the number is too large to list them all here.
The entire listing can be found at: http://xmlsoft.org/html/libxml-xmlerror.html#xmlParserErrors
The jing error reporting simply lists line numbers and a description, there are no error codes like libxml2.
All XML transferred must have a <VERSION> element. The document is invalid without one. This element is defined as an enumeration inside of the schemas.
The file formats should change infrequently, but there may be tweaks. Using a specific version when generating your XML allows us to guarantee that we never break your integration.
After a store has integrated using a specific version of the format, it is advisable to stick with the same version. Any revisions to the XML schemas will be documented and the version number increased.
There are two different time based options for exporting transactional data: one complete business day or "change set" syncs (real time). A complete business day contains all the data from the business day start time to the business day end time. A change set sync (used in real time) generally contains all the transactional data which has been created or altered since the last sync.
These two types of export methods must exist because a full business day export allows the deletion of data which has been previously imported, but has since been removed from the POS system. The change set sync allows only for the replacing of existing data and the addition of new.
Once per day, your system should send over yesterday's configuration and transactional data. This should be done after the POS has done all the necessary processing to close the day, but also early enough that the data can be imported into WhenToManage and processed before the managers and admins come in and expect to see reports on yesterday's sales numbers.
The daily extract must contain the entire set of transactional data for the business day because the WhenToManage system will remove all data already in the system for that date/time range and replace it. This includes change set data that was loaded during yesterday's business day.
This type of extract is also the means of sending historical data to WhenToManage. When the store is first setup, historical data should be sent over to WhenToManage one day at a time, until as much data as desired is loaded or the maximum amount of historical data that fits with the WhenToManage product purchased by the client.
The change set sync is for smaller, more frequent data syncs. It is expected only to contain new or changed transactional data.
By syncing data real time to WhenToManage, we are able to alert managers and owners about important in-store events as they happen; overtime, low inventory, large sales, large tips, etc.
A Change Set is not configuration data. It is, however, recommended even when sending a Change Set of transactional data that you resend the complete configuration in case a manager has made updates "today" in the POS that are needed to accurately deal with the transactional data in the Change Set.
Only transactional data contained in the XML with matching ID's is replaced. Any new IDs are added. No data is deleted during this type of sync.
The change set sync is only an update or addition of data, so it lends itself well to:
Real time integrations where the POS system sends data every 15 minutes (or less frequently) throughout the day. If you integrate via this manner, a full business day sync after close of business is still advisable.
Sending past data that has been changed (change sets), but when it is not necessary to send the entire business day. For example, if a few timeslips from last week were edited, a change set sync could send only those edited timeslips, along with timeslip ID. WhenToManage will replace only the changed data.
Restaurants typically change their POS configuration over time. WhenToManage, however, keeps only the most up-to-date configuration information from the last configuration file that is synced. This means that if you want the most accurate configuration data to accompany your historical data, you will need to load a configuration from that specific time period, right before loading the transactions.
Unless you are able to generate the configuration for the past, you should load the current configuration.
Loading historical configuration data can lead to the problem of overwriting current data while loading in historical transactions. In order to make sure the current data and configuration are in a usable state, older historical data should be loaded first and then move forward until "current's" configuration and transactions are loaded last and all the WhenToManage config matches "current" on the POS.
Restaurant owners are going to be very excited to see historical reporting in WhenToManage and will want to load as much of it as possible as soon as possible. In order to avoid stressing their Internet connections, we recommend starting slowly with each restaurant to get an idea of the size of their data and the speed of their Internet connection. We also recommend loading only about a month's worth of data the first time around and making sure that data is correct before loading larger historical data sets.
Each store has also purchased a product with a certain amount historical data. If data is sent prior to this time, WhenToManage will just drop the files and return error code 80. WhenToManage also reserves the right to throttle traffic from the server-side if any stores are syncing huge amounts of data.
It is imperative that you review this section so that you are familiar with possible reasons your data updates may not yet be reflected in the system.
The import assumes that all data coming across is valid POS data. Your sync should not send duplicate copies of the same order and expect us to sort out which is the most recent and valid copy. If data has been deleted from the POS system, the POS should not sync those orders with missing data, as the import will assume that the data sent is the full extent of complete data for those orders (even if the WhenToManage system already has a more complete data set for the same orders which were previously synced). This pertains to the business date syncing moreso than the change set syncing.
The XML is not restrictive for the NAME element of configuration items but WhenToManage will drop configuration items where the NAME element is blank.
To provide enterprise level reporting for potentially hundreds of stores, many reports require POS data to be "aggregated". This process happens automatically after the upload process has completed, however it may take between 2 and 5 minutes for the data to be reloaded.
Any report which displays on the WhenToManage dashboard, and has been run in the past hour, with the same set of parameters, returns cached data for that hour. Any other report run keeps data cached for 3 minutes. This means if you are constantly uploading data to the system and do not see the updates you expect, you should ensure you're not still in the cached data time frame.
Whether restaurants remove discounts ("promos") from their net sales varies across location and company. To accommodate this there is a setting in WhenToManage which will determine whether to remove them from net sales. If you see that your net sales numbers are off by the "promos" amount, check or uncheck this setting and re-upload your data.
Whenever the POS wishes to sync shifts that have been scheduled, it may make a call to fetch a schedule XML file for that store.
This process all happens via https with the sync client adding in the proper parameters to authenticate and tell the server its purpose. The server responds with XML.
The following REQUEST variables must be sent to the server, It does not matter if they are POSTed parameters or part of URL, i.e. GET parameters.
| Variable Name (case sensitive) | Description |
|---|---|
| username | POS sync username |
| password | POS sync password |
| locationid | Store Location ID |
| fetch_shifts | If present, and the parameter is non-empty, then XML for scheduling is returned. This should be used separately from archive_date or change_set as it will override either of those to send shifts and not accept data. |
The xml of the scheduled shifts will be returned as a gzipped xml stream as the complete response from the web server. There will not be HTTP headers. The client should be able to ungzip and read the stream.
When you retreive shifts from WhenToManage the time period you will be receiving shifts for one day before the time of the request being made. Thus if you have shifts from today and two weeks out, the system will send you all of these in the XML that is returned.
When you make this request, if there are no shifts you will receive an empty xml set like:
<xml version="1.0"?>
<UPDX_SCHEDULE xmlns="http://pos.whentomanage.com/updx/schedule">
    <VERSION>1.0</VERSION>
</UPDX_SCHEDULE>
If shifts exist, you can expect to receive the xml stream described in the UPDX Schedule Schema Documentation.
One thing to be wary of if you are not reading deep into the XML documentation (which we hope you are). TRANSACTIONS have two fields - RECEIVED and APPLIED. The only difference between these two fields is the amount of change a customer received. APPLIED should the be total amount of money the restaurant took in from the customer. For instance, if they paid taxes or auto-gratuity it is payment to the restaurant, included in the applied amount.
It is important to note that the ITEM_PROMO|ITEM_COMP AMOUNT is is not multiplied by the ITEM QUANTITY. The amount included is considered to be the entire amount of Promo/Comp applied to the related ITEM, even when when an item has a quantity greater than 1. For example, assume there are three "Burger Meal" items sold and included in one ITEM tag with quantity three, if there was a discount of $1.00 per Meal, then the associated ITEM_PROMO has $3.00 for the AMOUNT.
POS systems may track payments on accounts receivable different from other paid ins. In WhenToManage, these should come through as normal PAYMENT elements. If there is not already a specific payment reason for paid in A/R in the POS, then it might be best to make one global reason, "Paid in A/R", rather than try to send a separate reason definition for every individual customer, such as "Customer 35 paid A/R", "Big corp paid in", "Harvey Stone paid up".
Mostly, POS systems track sold items by check rather than order, so this is the default in the UPDX format. Each check has its own items. It is possible that the POS tracks items by order and not check, however. WTM has allowed for this in the XML by making the ITEM element "zeroOrMore". In this case all items can just be placed on one of the checks associated with the order and they will get imported properly. If none of the checks on an order have any items, WTM may drop the order altogether.
The POS system may allow promos (or comps) to be applied to an entire order and not to specific items on that order. In this case, the XML must still put the ITEM_PROMOs in place per item, but the integration determines which items to place the Promo on. There are two general ways that people do this.
Apply a promo matching the full ITEM price to each non-voided item successively until the entire promo amount is accounted for. For example, if you have four ITEMs that were $0.50 each and an order-level promo of 78 cents, your first ITEM would get a 50 cent promo applied and the next ITEM would have a 28 cent promo applied. The last two ITEMs would have no promo amounts on them.
Distribute the values proportionally to all items based on their price. In this case it is important to be careful with rounding so that the entire promo amount is accounted for. For example, if you have 61 cents for a promo distributed across 4 ITEMs, instead of each promo amount being $0.1525, three would be $0.15 and one $0.16.
Below is a list of data points that you will need to validate along with the name of the WhenToManage report that you will validate against. Each section below is separated by the WhenToManage report that you will use to find the data point. All data points are numbered and are cross-referenced on a sample screen shot of the report to make it easier for you to find the data point.
The data points are listed below the screen shot. This report is located on the Dashboard.
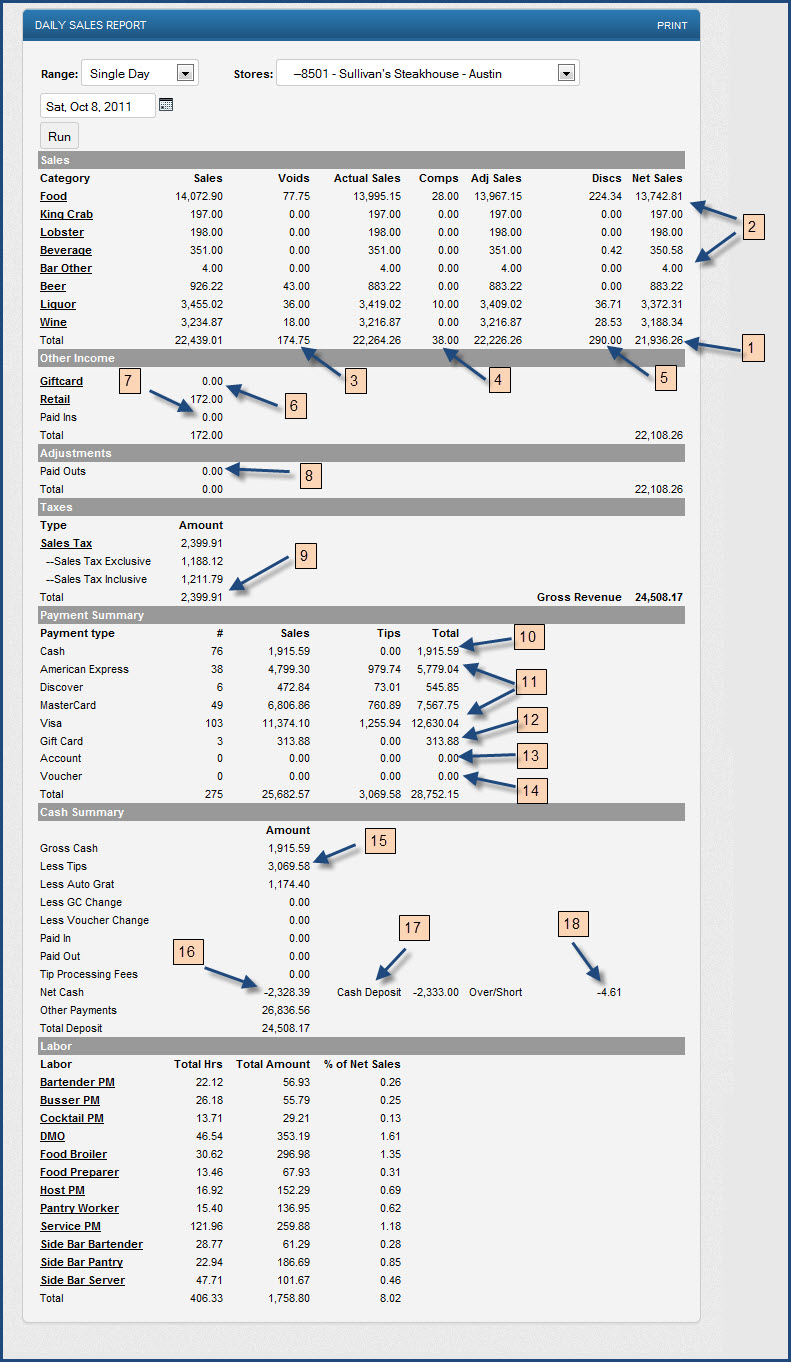
Net Sales
Sales Category Totals
Voids
Comps
Discounts
Gift Cards Sold
Total Pay Ins
Total Pay Outs
Total Sales Tax
Cash
Credit Card Total
Gift Cards Redeemed Total
House Account Total
Other Payments Total
Total Tips
Net Cash
Total Cash Deposit
Cash Over/Short
The data points are listed below the screen shot. To find this report go to: Reports => Sales => Product Mix
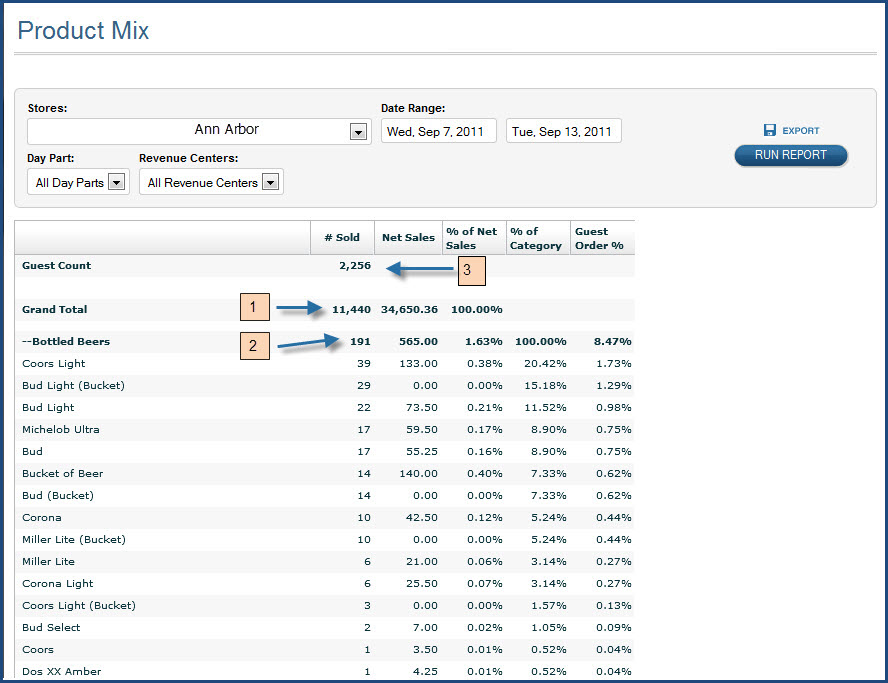
Net Quantity Sold
Sales Category Qty Totals
Guest Count Total
The data points are listed below the screen shot. To find this report go to: Reports => Drilldowns => Tender Detail
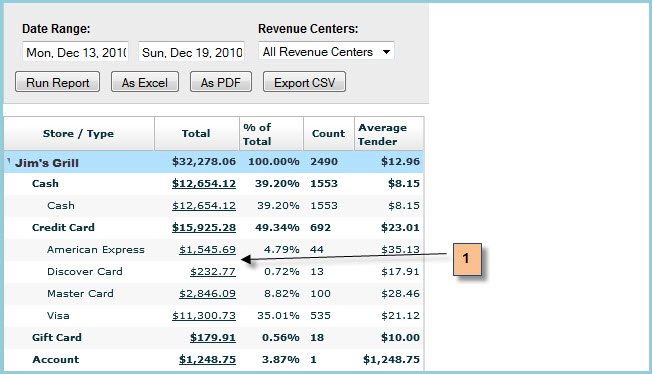
Credit Card Totals
The data points are listed below the screen shot. To find this report go to: Reports => Drilldowns => Labor Summary (N.B. This report is a drill-down report. You can use this report to validate daily, weekly, or monthly data.)
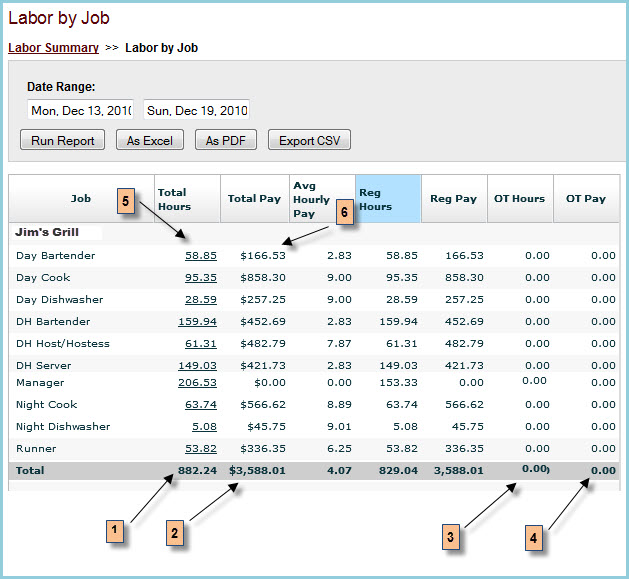
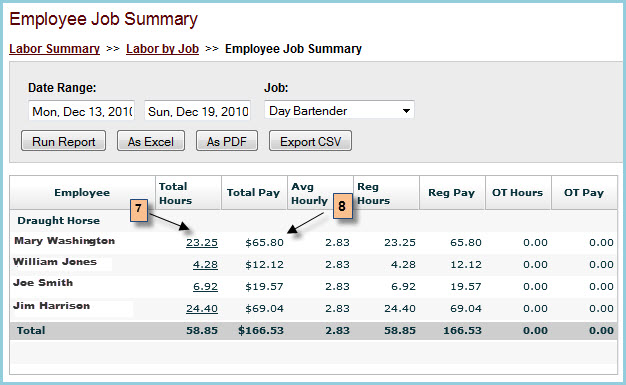
Daily Total Hours
Daily Total Dollars
Daily Total OT Hours
Daily Total OT Dollars
Daily Job Total Hours
Daily Job Total Dollars
Daily Emp Total Hours
Daily Emp Total Dollars
Example 1. C# upload example
    using System;
    using System.Text;
    using System.Net;
    using System.Web;

    namespace UpdxExample
    {
        class Program
        {
            static void Main(string[] args)
            {
                Uri wtmUri = new Uri(
                String.Format("https://pos.whentomanage.com/index.php?username={0}&password={1}&locationid={2}&file_category={3}",
                    HttpUtility.UrlEncode("possyncun"),
                    HttpUtility.UrlEncode("possyncpw"),
                    HttpUtility.UrlEncode("storeloci"),
                    HttpUtility.UrlEncode("config"))
                );

                string filePath = @"C:/your/path-to/config.xml";

                Console.WriteLine("Preparing upload to: {0}", wtmUri.ToString());

                WebClient myWebClient = new WebClient();
                byte[] result = myWebClient.UploadFile(wtmUri, filePath);
                Console.WriteLine("Result: {0}",System.Text.Encoding.ASCII.GetString(result));
            }
        }
    }
Example 2. PHP upload example
    //The whentomanage url
    $url = "https://pos.whentomanage.com/index.php";

    //The location of your configuration file for upload
    $file_path = "/path/to-your/config.xml";

    //"transactions" or "config". "config" type does not require archive_date or changeset.
    $file_category = 'config';

    //POS sync username
    $username = 'possyncun';

    //POS sync password
    $password = 'possyncpw';

    //Store Location ID
    $locationid = 'storelocid';

    //Put variables in request array
    $post = array(
            'username' => $username,
            'password' => $password,
            'locationid' => $locationid,
            'file_category' => $file_category,
            "X"=>"@$file_path",
            );

    //Initialize a cURL session with our whentomangage url
    $ch = curl_init($url);

    //Settings for curl, these may vary depending on your needs
    curl_setopt($ch, CURLOPT_HEADER, 0);
    curl_setopt($ch, CURLOPT_VERBOSE, 0);
    curl_setopt($ch, CURLOPT_TIMEOUT, 45);
    curl_setopt($ch, CURLOPT_ENCODING, 'gzip');
    curl_setopt($ch, CURLOPT_RETURNTRANSFER, true);
    curl_setopt($ch, CURLOPT_FOLLOWLOCATION, false);
    curl_setopt($ch, CURLOPT_USERAGENT, "Mozilla/4.0 (compatible;)");
    curl_setopt($ch, CURLOPT_POST, true);
    curl_setopt($ch, CURLOPT_POSTFIELDS, $post);

    //Perform a cURL session and get the response from the server
    $response = curl_exec($ch);

    if(!$response) {
        echo "\n" . curl_error($ch) . "\n";
    }
    else {
        echo "\n" . $response . "\n";
    }

    curl_close($ch);
Example 3. C# shift retrieval example
        using System;
        using System.IO;
        using System.IO.Compression;
        using System.Text;
        using System.Net;
        using System.Web;

        namespace UpdxExample
        {
            class Program
            {
                static void Main(string[] args)
                {
                    // sample code to fetch shifts from WTM, and write to a file in C:\tmp\SHIFTS.XML, "transparently" decompressing the code
                    Uri uri = new Uri(
                        String.Format("https://pos.whentomanage.com/index.php?username={0}&password={1}&locationid={2}&fetch_shifts=true",
                        args[0],
                        args[1],
                        args[2]
                        ));
                    string save_folder = "C:\\tmp\\";

                    HttpWebRequest webrequest = (HttpWebRequest)WebRequest.Create(uri);
                    webrequest.Method = "GET";
                    webrequest.Headers.Add(HttpRequestHeader.AcceptEncoding, "gzip,deflate");

                    HttpWebResponse responce = (HttpWebResponse)webrequest.GetResponse();
                    Stream s = responce.GetResponseStream();
                    if (responce.ContentEncoding.ToLower().Contains("gzip"))
                    {
                        s = new GZipStream(s, CompressionMode.Decompress);
                    }
                    else if (responce.ContentEncoding.ToLower().Contains("deflate"))
                    {
                        s = new DeflateStream(s, CompressionMode.Decompress);
                    }

                    string write_to_file = save_folder + "SHIFTS.XML";
                    StreamReader sr = new StreamReader(s, Encoding.Default);
                    StreamWriter shifts_w = new StreamWriter(write_to_file, false);
                    shifts_w.Write(sr.ReadToEnd());

                    sr.Close();
                    shifts_w.Close();
                    responce.Close();
                    s.Close();

                }
            }
        }
Example 4. PHP shift retrieval example
    //The whentomanage url
    $url = "https://pos.whentomanage.com/index.php";

    //POS sync username
    $username = 'possyncun';

    //POS sync password
    $password = 'possyncpw';

    //Store Location ID
    $locationid = 'storelocid';

    //Put variables in request array
    $post = array(
            'username' => $username,
            'password' => $password,
            'locationid' => $locationid,
            'fetch_shifts' => 'true',
            );

    //Initialize a cURL session with our whentomangage url
    $ch = curl_init($url);

    //Settings for curl, these may vary depending on your needs
    curl_setopt($ch, CURLOPT_HEADER, 0);
    curl_setopt($ch, CURLOPT_VERBOSE, 0);
    curl_setopt($ch, CURLOPT_TIMEOUT, 45);
    curl_setopt($ch, CURLOPT_ENCODING, 'gzip');
    curl_setopt($ch, CURLOPT_RETURNTRANSFER, true);
    curl_setopt($ch, CURLOPT_FOLLOWLOCATION, false);
    curl_setopt($ch, CURLOPT_USERAGENT, "Mozilla/4.0 (compatible;)");
    curl_setopt($ch, CURLOPT_POST, true);
    curl_setopt($ch, CURLOPT_POSTFIELDS, $post);

    //Perform a cURL session and get the response from the server
    $response = curl_exec($ch);

    if(!$response) {
        echo "\n" . curl_error($ch) . "\n";
    }
    else {
        echo "\n" . $response . "\n";
    }

    curl_close($ch);
[1] One other thing that we should note because it isn't clear from the schema documentation is that several elements are <optional> in pairs, meaning they should always be present together, or both absent.
In ORDER
<optional>
<element name="REOPEN_TIME">
<element name="REOPENED_BY">
</optional>
in TRANSACTION
<optional>
<element name="VOUCHER_TYPE_ID">
<element name="VOUCHER_NUMBER">
</optional>
in ITEM
<optional>
<element name="VOID_STATUS">
<element name="VOID_REASON_ID">
<element name="VOID_MANAGER_ID">
</optional>
The documentation shows the second field as optional, but doesn't group them together to show both must appear together. "GUEST_COUNT, REOPEN_TIME, REOPENED_BY ? , ( CHECK )+" makes REOPEN_TIME look non-optional. We are working on fixing our process which generates the docs, but it is correct in any xml schema itself.
[2] Yes we could tell POS type if the location ID is correct, but we'd prefer to leak as little information as possible.